Adobe Premiere
- 1.1 Adobe Premiere Tips
- 1.2 Adobe Premiere Import Export
- 1.3 Edit 4K Video in Adobe Premiere
- 1.4 MTS to Adobe Premiere
- 1.5 MP4 to Adobe Premiere
- 1.6 MOV to Adobe Premiere
- 1.7 FLV to Adobe Premiere
- 1.8 AVCHD to Adobe Premiere
- 1.9 Premiere to YouTube
- 1.10 Premiere to DVD
-
2 Adobe Premiere Plugin
-
3 Adobe Premiere Alternative
-
4 Adobe Premiere Specs
How to Edit 4K Footage in Adobe Premiere
What is 4K TV?
With recent advancement in technology and a never ending urge for pure cinematic home experience, we have witnessed a rapid advancement in the field of display resolution. In recent years we have heard a lot about the 4K. What exactly is 4K and its purpose? You might have heard a shopkeeper stating about characteristics of a particular TV, and somewhere mentioning about UHDTV. 4K is basically a horizontal pixel resolution technology which has become a standard resolution for movie production and high end imagery. As the name applies, 4K contains 4,000 pixels per a standard image. However; 4K technology has different resolution standard when it comes to the television display. While a standard raw 4K file would have a resolution of 4096 X 2160 Pixels for industrial use, the UHDTV (Ultra High Definition Television), uses 3840 X 2160 Pixels. The 4K Footage has been adapted as a standard resolution for cinemas and industrial recordings. However, the usual vertical Television has relatively limited pixel viewing. In short, a 4K resolution would give better and wider viewing of a frame, with much more crisp result than a 720P television. The photo below shows the view angles difference between the three images resolutions.
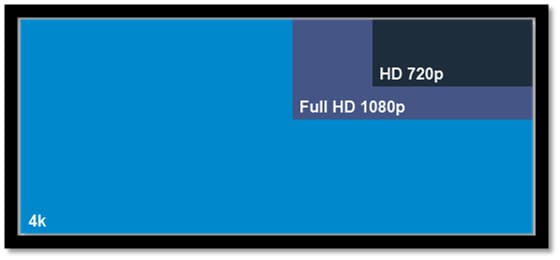
Although, 4K image technology has been in commercially usage since the invention of high quality cameras in 2003, it was not until 2009, that this technology was incorporated into television and for home entertainment purposes. Today there are various television brands in the market which offer 4K compatible televisions to the general public. The UHDTV services are a commercial name given to the 4K compatible television. However, these products are pricey and not in the reach of buyers with tight budget. However; an important thing to note here is that 4K files cannot be edited or changed through their horizontal properties; therefore, such files will have to be edited by vertical method.
How to Edit 4K in Adobe Premiere?
It is very common for you to end up with a 4K file on you disk, which seems to put your computer to test. Not only will you get error while trying to open the file, the computer will also slow down to its minimum capacity and the screen will most likely hang. Even fast computers with a high end RAM and speedy processor seems to give up when it comes to 4K files. The problem is with the image editing software and not just a slow computer specs. This is where Adobe Premiere comes in to help you edit 4K files easily.
RED is one of the most popular cameras for high end 4K industrial recording. This is the kind of camera which is used to produce sci-fi Hollywood movies and all other high standard recordings. The video footage recorded by RED cameras is 4K by default. Therefore, you will need to edit the files before you can use them on a variety of PC’s and/or televisions. Follow the steps below to see how you can edit 4K footage in Adobe Premiere.
Step 1. Update importer plugin
Open Adobe Premiere Pro and look for an update for the RED importer plugin. You can search for the importer plugin over the internet. Adobe has an updated version of the importer placed on their website. It is free to download instantly. The file is not big, and should only take few seconds provided that you are using a fast broadband connection. Adobe Premiere CS6 will come ready with these updated files, however; you will need to manually download these files for version 5.5 Premiere or below. Once the file is downloaded, you can unzip the folder and install both files manually. The folder will be containing documentation in case you need to read instructions.
Step 2. Build a new project
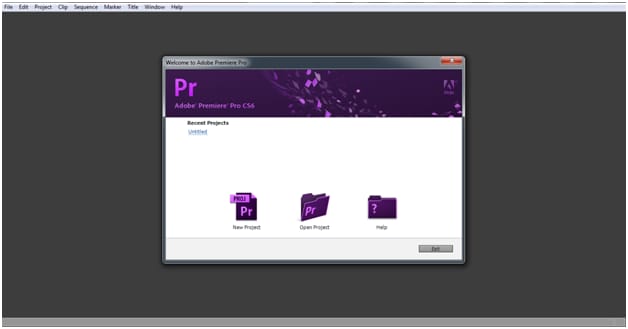
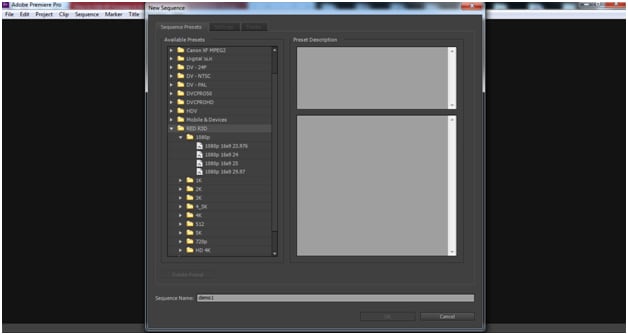
Once done, start the Premiere Pro and click on "Start a New Project". Once you choose to do this, a pop up window will appear with lots of options on the left hand side of screen. From these you will choose RED R3D (Note: It is important to know the exact type of file which you have, and make selection accordingly). These selective options come ready with the CS6 and you do not have to install them manually.
Step 3. Choose the settings
As you select the RED R3D option, a subcategory will appear below the button and give you further options. Here, choose 1080P that will be appearing on the top (Note: You can choose a different output if you have specific standards). The main reason for choosing a 1080P output is because of the speedy process. Once the editing is done, you can change it back to the 4K version once editing is done. Otherwise, it will be a pain in the neck to edit a 4K file, especially if you do not have a superior PC.
Step 4. Import 4K videos
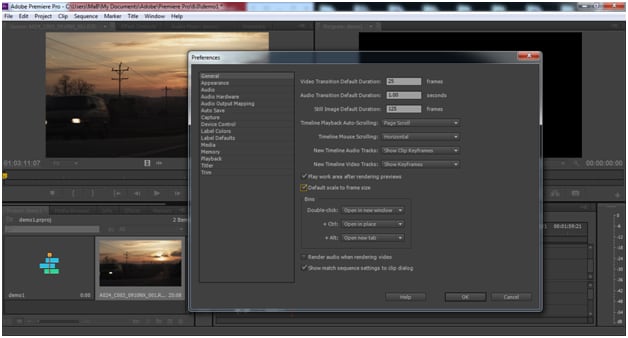
Next, locate and import the 4K footage file from your drive. You will see that the file is scaled to 100 percent. Thus, the footage will be zoomed to a high standard, and would need to be scaled down to fit your 1080p editing window. However; the file is still in the 4K format and it would not be helpful to scale it directly. Thus, go to ‘Edit’ Tab, and choose ‘Preferences’ > General, and check the box reading “Default scale to frame size”. Delete the clip and bring it back again. You will see how it fits the editing screen perfectly. 47% scaling ratio should work fine with this. You can do this by moving the red bar towards left.
Step 5. Edit 4K videos
For the RED Files, you can further edit these by right clicking on the project window and choose “source settings”. It will open up the footage along with various options for brightness, curves, gamma setting and a lot more. This will automatically update the footage in your editing window. Once you have done the desired editing, you can save the project and view it further in after-effects.
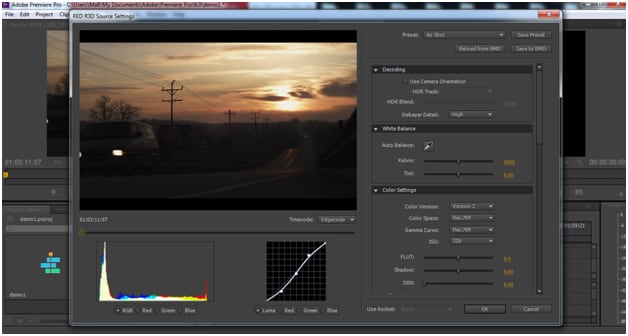
This was a general 4K editing for RED files, however, you can choose the settings as per your source file.
This is a basic tutorial about Adobe Premiere, professional video editing software. However, if video editing is new to you, consider Wondershare Filmora (originally Wondershare Video Editor), which is a powerful but easy-to-use tool for users just starting out. Download the free trial version below.


